New Softwares And tools

System tools ,Internet Tools haking tools Web Design tools and More.........

Hacking tips and tricks

Hacking, windows, facebook and computer tricks. Learn to do cool tricks with your ....

This is default featured slide 3 title

Go to Blogger edit html and find these sentences.Now replace these sentences with your own descriptions.This theme is Bloggerized by Lasantha Bandara - Premiumbloggertemplates.com.

This is default featured slide 4 title

Go to Blogger edit html and find these sentences.Now replace these sentences with your own descriptions.This theme is Bloggerized by Lasantha Bandara - Premiumbloggertemplates.com.

This is default featured slide 5 title

Go to Blogger edit html and find these sentences.Now replace these sentences with your own descriptions.This theme is Bloggerized by Lasantha Bandara - Premiumbloggertemplates.com.

Showing posts with label Windows Tricks. Show all posts

Tuesday, February 26, 2013

How to Create autorun file for pendrives or usb drives


Hey Friends, today i am going to teach you "How to create a Autorun.inf file for USB drives or simply CD drives" so that it can execute programs. Programs can be viruses, keyloggers, rats or simply normal services that you want to execute automatically whenever user open his/her pendrive or USB drive. Its the easiest way to spread your programs to schedule, so that they can execute by itself without any user interaction.
Creating a simple or complex autorun file for your pendrive or USB drive.

Note: You can also follow these instructions when making a CD. You just have to burn it on the cd.
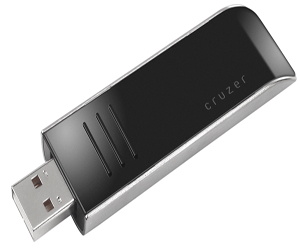
sandisk cruzer contour 16gb usb pen drive

When you plug a  USB or pen drive in, you might be interested in making a program, or other things happen as soon as you plug in. The way you accomplish this is through the Autorun.inf file. The autorun.inf file is located in the root of the usb drive and tells Windows what to do automatically.

This autorun can be used for good things and also for bad things depending on what you like. I am Destructive Mind, so i use it to run my coded viruses and keyloggers to execute automatically by themselves as soon as user open folder or simply opens pen drive or usb drive.


This tutorial covers:
  • Creating a USB Autorun.inf
  • Changing label\icon of thumbdrive
  • Making a new option appear in the autorun menu
  • Making programs automatically run when plugged in
So Read On How to create Autorun.inf file...
  
Creating a USB Autorun.inf :

To create an autorun file, open Notepad and save ‘autorun.inf’’ (with quotes) and save it to the root of the drive. All it needs to have is in the first line;


[autorun]


Changing label\icon of thumbdrive:
Follow the steps in Creating a USB Autorun.inf. Before you save it, type this in in this order!

[autorun]


icon=myicon.ico

label=MyLabel


And save. Make sure the icon file is in the root of your drive.


Making a new option appear in the autorun menu:

Right, so make your autorun file and type this into Notepad:


[autorun]

icon=default

label=[yourlabelhere]


action=programname.exe


Open Program


Save it and exit. Once again, the program has to be in the root. Now, when you plug it in, the option should appear in the menu.


Making programs automatically run when the USB is plugged in:

Follow the same instructions, blah blah blah;


[autorun]

Icon=default

label=YourLabelHere

open=programname.exe


And that’s it for this tutorial! Your Autorun program is ready to execute whatever you want. Here i have written to execute a simple program called programname.exe

If you have any questions or queries, ask in form of comments. If you like my articles just a comment of appreciation will do the thing.


Tuesday, February 19, 2013

Create your own theme on Google Chrome

 You can create a Google chrome theme of your own.It's very easy to make a Google Chrome theme.Here are simple steps to create a Chrome theme.

            1) You need to download a extension from Chrome store. You can download it by clicking here.


             2) Then lauch the app.

           3) Upload your image.

       4) Then edit the tab by adding some colors to it.

       5) Finally install the theme. You can also share the link, which is finally generated to your friends.

                   Start creating your own Google themes now :)

Roll back window 8 start menu like window 7


missing start menuWindow 8 new start menu "Metro" took place of old classic window start menu but still some people like me want to roll back to old style start menu. Most of the window 7 and xp user who installed window 8 recently they feel like they are missing something on window 8 because most of us finds our working way from start menu for example like control panel , All programs , Documents and devices and printers etc.
Start menu makes works little easy so lets find out 

How we can get back classic start menu on window 8.

We have 2 methods lets try both.

Method 1
1. Press Window key + R
window key + R
2. A Window will Pop up Write in that regedit and click Enter.
search Regedit
3. You will see regedit.exe run it as administrator.
4. Now Navigate to HKEY_CURRENT_USER\Software\Microsoft\Windows\CurrentVersion\Explorer
Note : Don't Expend Explorer
RPEnable start menu
5. Double click on RPEnabled and Set the value to 0 . Now Restart your Pc.Your Done 
    Now you will see a old style start menu.if you again want metro style start menu you can follow the same procedure and set the value of RPEnabled to 1 then restart your pc you will get back to metro style start menu again.

    Method 2
    if you don't want to do it manually you can download a program called start8. After download install this program After that you can easily select your favorite style for window 8.
    start8 program
    Hope These Both method will help you . if you have any confusion you can ask to me by leaving comment below .i would like to help you guys.

    Hope you liked My this post please give your Suggestion , Advice below to improve this blog. If you have any question please don't hesitate to ask

    Boost your Pen drive Transfer Rate


    We all use pen drives to carry data and exchange data. But with constant usage its transfer rate i.e. the speed of copying the files from and into it, detoriates and thus its transfer rate becomes very slow and irritating. So If your Pen Drive File Transferring speed is slow and you want to restore back to its normal fast speed try this trick. 


    Here is the way to boost your Pen drive Transfer Rate and speed up the coping files on pen drive :


    1. Connect your pen drive


    2. Go to "my Computer

    3. Right Click on "Removable device" which is your Pen Drive letter

    4. Now Select the Last Option that is "Properties" 
    5. Go to "Tools" option. 
    6. Select "check disk error" and Click OK.  
    7. Now Again Right Click on your Pen drive and Select "Format" option [ make sure you backup your data ] 
    8. Click on "Default value" 
    9. Uncheck (unmark) the "Quick Format" option. 
    10. Click on Format 
    Note: Please wait as this will take some time to finish. This Process will definately speed up the copying rate of your pen drive.

    Monday, February 18, 2013

    Usefull Firefox Keyboard Shortcuts


    Today in this post i am going to share with you guys some simple yet usefull and powerfull Mozilla Firefoxkeyboard shortcuts that can save your time and make it easy for you to work on firefox browser. Shortcuts you will learn include easily copying url, bookmarking websites, scrolling page and more. So lets get started.


    FireFox Keyboard Shortcuts

    1. Press CTRL + L to directly go to the address bar.
    2. To copy URL of websites from address bar Simply single click on the URL, this will select the whole address, then use CTRL + C for copying and CTRL + V for pasting.

    3. Press Spacebar to scroll down the page.
    4. Press Shift + Spacebar for quickly scrolling up.
    5. Use CTRL + T to open a New Tab
    6. Use CTRL + W to close the Tab
    7. If you use certain website more frequently bookmark that site by simply pressingCTRL + D for easily accessing later.
    8. To find certain word or phrase in web page press CTRL + F and use ALT + N for finding Next.

    How To Hack Saved Password In Firefox ?


    firefox hacks
    In my previous post i had posted two tutorials onHow to hack google chrome saved password ? andMore simple way to hack google chrome saved passworod. In this post i will share with you guys how to view saved password in Mozilla Firefox web browser. This trick can be helpfull if you get your hands on someone computer maybe your friends and he has saved password for certain websites like gmail, facebook,yahoo etc then you can easily view his password with very simple and easy trick that i am going to share today. 

    For demonstration purpose i have already saved a fake email password for facebook. But it will work on any website. So lets get started.

    How to do ?

    1. Open Firefox Web Broweser
    2. Then Click on FireFox > Option > Option as shown in below picture
    3. Then a POP Up box will appear, In that go to security and click on Show Passwordsas show below.
    4. Now click on website whose password you want to see ans click on show passwordas shown in below image. (Note: It will ask for confirmation so click on yes when dialog box appears)

    5. Done, You have hacked password of your victim with few simple steps. You can try this at school computer lab if someone have saved their password. 

    Making Nameless Folder In Windows


    creating nameless folder
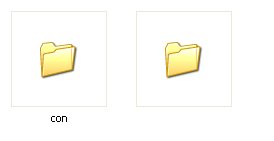
    In this small tutorial i will show you a smilpe windows trick. Basically you can not make folder with no name on windows. This trick will allow you to make folder without any name. This trick works on any windows  operating system.


    How To Make Nameless Folder

    Before attempting this trick, try to make a folder with no name and you will fail to do so. This is what this trick will let you do. Below is screenshot of folder before and after doing this interesting trick.
    creating nameless folder
    1. Make a Newfolder on desktop or where ever you want.
    2. Right click on this newly created folder and select Rename.
    3. Erase the text showing "New Folder".
    4. Now keep Pressing Alt (i.e alter key) and type 255. If you are on laptop then you need to enable your Num Lock and type from the highlighted number keys not from those below function keys.
    5. After that leave alt key and Press enter.
    6. Done you just created nameless folder.

    Install Windows XP from USB Flash drive

    good application to make us easier to install Windows from a USB Flashdrive, Pen drive, Flashdisk, etc... with WinToFlash you can install Windows XP/2003/Vista/2008/7 from USB Flashdrive easily.


    WinToFlash Step by step Guide Install Windows XP from USB Flash drive:

    Requirements:
    -USB Flash disk/Flash drive/Pen drive/Thumb drive, etc
    -Computer with CD/DVD drive to build this Windows XP setup Flashdisk (or you may use computer without CD/DVD drive, but you have to copy Windows XP setup files from another computer to your hard disk)
    -Computer with or without CD/DVD drive (e.g. Aspire One)

    Step 1:
    Download WinToFlash here 
    from the Author: This software may contain bugs (spelling too).

    so if you find any spelling error please write a comment and correct it
    or report to support@novicorp.com
    don't forget to write your WinToFlash version.

    Step 2:
    Extract the zip file, then double click on WinToFlash.exe


    Step 3:
    Click Accept button...

    Step 4:

    This program will transfer Windows setup from CD or DVD to flash drive Recommended to switch on Wizard mode for users have no experience of Windows setup fine tuning Windows setup transfer wizard Following basic instructions you will transfer Windows setup program to flash drive and install Windows on PC have no CD or DVD drive
    Click the button to enter Wizard mode...


    Step 5:
    This program will help you to install Windows from a flash
    To access other features and advanced options swicth to advanced mode (for advanced users).
    for now, we will use wizard mode instead of advanced mode, so click Next...


    step 6:
    Specify locations of files and drive
    on Windows files path click Select button


    Step 7:
    Select CD/DVD drive which contains Windows XP CD or folder which contains Windows XP files... then click OK


    step 8:
    Specify locations of files and drive
    on USB drive click Select button

    Step 9:
    Select USB Flash drive ... then click OK

    Step 10:
    Specify locations of files and drive
    Click Next button...


    Step 11:
    Select "I Accepted the terms of the license agreement" then click Continue...


    Step 12:
    Warning! Formatting will erase ALL DATA on target disk. To format press OK, to quit press Cancel

    Click OK...
    Step 13:
    Please wait while WinToFlash transferring Windows setup to flash drive


    Step 14:
    Finished... click Next then Exit
    USB Flash drive ready...


    On computer without CD/DVD drive (e.g. Aspire One)
    you must change the first boot order to USB Flash drive from BIOS. How to do this?

    Change Boot order from BIOS:
    This is just for example (Aspire 4710)
    your BIOS interface may be slightly different

    Step 1:
    Plug a Flash drive into a USB port on your computer/laptop

    Step 2:
    Turn on your laptop then hit F2 rapidly (or Del for some other machine)
    then go to Boot tab > change boot order > then hit F10 key to Save and Exit


    Now you can boot from USB Flash drive, first select
    1st, text mode setup (Boot from flash again after finished)
    then... on the first restart, select
    2nd, GUI mode setup, continue setup + 1st start of Windows
    Install Windows XP as usual...


    Good luck...
    please let me know if you find a problem...
    and help the Author by report any application bug (and spelling too)

    UPDATE 1:
    How to Install Windows 7 from USB Flash Drive / Flash Disk / Thumb Drive / Pen Drive 


    UPDATE 2:

    Anonymous said…

    first i wanna say thank you for everybody in this forum,after trying many time i had come out a solution, or maybe saying a sharing season for everyone, hope can help other that is still tension with it haha....actually im the guy previously anonymous asking so many question

    Hello everybody, before I had successfully install window Xp using wintoflash, I had facing many problem. Here I wish to share my experience using the wintoflash.
    Netbook: Hp mini (come with window 7 starter edition)

    Step1:
    Having your window Xp installer disc, by using the wintoflash software, make a bootable USB flash drive.
    Recommendation –choose advance option, at the format tab, under file system choose FAT 16 LBA (previous I had choose FAT 32 LBA, during booting from USB flash drive an error will occur, so try using FAT 16 LBA first if can’t try using other format will solve the problem).

    Step2:
    If your laptop comes with original window, it most probably has made a recovery partition for you. From my experience, I recommend this partition should be deleted, if not it will cause other problem (boot problem, hal.dll error) during the reinstall of window.
    First choose the first option, you will be able to go to the window installation (create partition, delete partion page).
    Recommendation--- deleted all the partition that set previously, than only create your own partition.

    Step 3:
    At this stage after u had created your partition, and install the window at the partition that u had select. The window will be restart automatically for the first time. After restart, the window won’t startup and continues the window installation; this time u need boot the flash drive again and choose the 2nd option. If any error (eg. Hal.dll) occur, try using the other option that had stated.

    Step4:
    By now this window will continue the installation. After finis the installation, window is now functioning. BUT in this state, you will probably facing a problem that the window can’t boot from the HDD, although the 1st priority had been set at the BIOS to boot from hard disk. For me every time I need to startup into window I need to boot from the flash drive.
    Solution---- try using window recovering console, this really help…ok sharing seasons again. As for me, I can boot the recovering console at the window setup page, the solution is I login into window by using my flash drive first, and I make an virtual drive(can be using power ISO) and load the window xp cd (cause hp mini netbook don’t hv cd room) so this step had to be done.
    In order to install the window recovering console u can go http://support.microsoft.com/kb/314058 and http://support.microsoft.com/kb/307654
    If you have the recovering console the previous step can be skip.
    After the console had been install by using the method above, the window recovering console will be able to choose after the system is restart. Then follow the instruction from this link http://wintoflash.com/forum/viewtopic.php?f=10&t=366
    After finish all this step, window Xp will be able to load up normally from the hard disk of your netbook.
    If the window start up screen keep on appears, you can see the reference from this link http://itnetworklk.blogspot.com/2013/02/disable-windows-xp-startup-screen.html